Building a Slithering Conger

By Nina Budabin McQuown

Over the centuries, naturalists have described the fens as a landscape of extraordinary fertility and disturbing darkness. At once a place “of manifold horrors and fears, and the loneliness of the wide wilderness,” and a place of abundance, “plentifully endowed” (Merchant 169, 166). 

Perhaps the most potent symbol of that overlap of horror and abundance is the conger eel, a fish native to the fens, congers can grow massive in proportions, the recent record is 20 feet in length and over 130 pounds after gutting. 

pastedGraphic.png

Slimy, sharp toothed, and writhing, eels are also delicious. They were a central part of a local economy that depended on the land—including hunting, fowling, and cutting peat for fuel. Eel fishermen used baskets trap to catch them and transport them to markets.

pastedGraphic_1.png

For the fen landscape we’re building for Tiddy Mun, then, eels are an essential part, but in building our eels, we want to be sure that their movement communicated both size and slithering, abundance and slime. 

I wanted a puppet that could move like a real eel, and as I planned it, I thought of the toy wooden snakes I’d had as a child. Those snakes are built of a large number of wooden disks connected by a cloth spine. The internet, beneficent in all things, has an excellent tutorial on how to make them from scratch, but I needed our eels to be five to six feet long and five to six inches in diameter, so wood would be far too heavy to use as a material. Instead, I went for lighter cardboard. Instead of flat disks (I tried it, it would’ve taken approximately three hundred of them, individually cut in graduating size, to get the length and shape we needed!), I bent strips of cardboard into thicker rib shapes to build a skeleton. The plan was to connect them with fabric, then cover them with shining black nylon skin. In the end, this method produced an eel-like body shape, but if anything it was too flexible. It would require four hands to operate, and puppeteers might end up obscuring the puppet when all was done! 

Amy reminded me of another kind of toy snake:

pastedGraphic_2.png

These wider segments might hold up under the weight of the puppet and still slither, so I cut and bent cardboard into the shape of the segments, then built a frame for the eel’s face, tale and flippers:

pastedGraphic_3.png

pastedGraphic_4.png

For added strength, I used a cornstarch glue and cardboard paper mache to cover the body of the eel:

pastedGraphic_5.png

I painted the eel, then attached each segment with a vertical wire, allowing them to slide individually from left to right. Two glass eyes made the puppet live, and the final product moved like this:

So here I am finally, a proud eel fisherman with my catch (and my cat):

pastedGraphic_6.png

Re-Building Selkie

By Genna Beth Davidson

As we endeavor to mount Malevolent Creatures: What the Waves Bring as part of Space4 with CulturalDC, a big build is underway in my studio space. When we did a 20 minute section of the piece last year I had the main selkie puppet constructed enough for use, but she was far from finished, and I discovered some problems during that workshop. 

For one, the puppet has to be worn by our puppetress, Amy Kellett, who quickly discovered that the play we’ve written doesn’t have many “down” moments for Selkie. The lower legs of the puppet are Amy’s legs and the puppet is attached at the knees. Amy holds the puppets head and controls the movement of one arm, but it is actually taking A LOT of arm and back strength to keep the puppet from slumping down. This is a problem that my redesign/rebuild needs to address. I haven’t quite figured out yet how to handle it. I might reach out to a master designer in our area for some help.

Secondly I decided to put the puppet in a nude unitard because for some of the scenes she appears nude, but it didn’t end up looking like she was nude; it looked like someone wearing a nude unitard. In retrospect I think to myself “duh!” So I had to deconstruct the unitard and pull the material taut over each body part. This way it will look more like a nude woman. It’s very tricky pulling the fabric taut though. It wants to fold in ways that make it look like fabric. Learning to do this skin-job is a new challenge that I’m still figuring out too. 

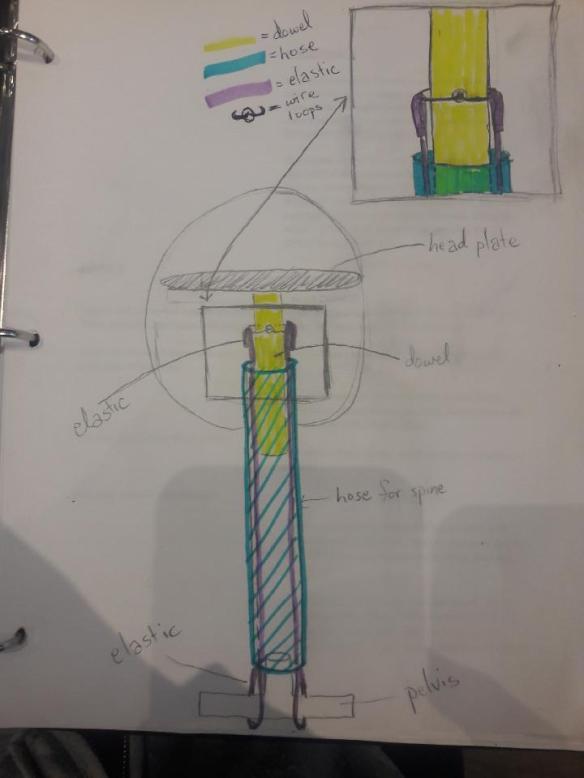
Puppetry is full of problem solving. I never seem to anticipate all the challenges that come up, but that’s part of the fun for me. I remember working on a show a few years ago in which I built a puppet whose head didn’t move from side to side because of the way I designed the shoulders. It was a total accident, and then I had to quickly figure out how to adjust that design. I came up with a design in which I inserted the neck dowel into the hosing that was the spine. I kept them together with  elastic that ran the length of the spine and connected through the tubing and up to the top of the neck dowel where I had wired some loops around which I could sew the elastic (see image). It was pretty cool figuring that out. I love it when a problem comes my way. It’s the best part of building for me! 

20180116_120618_1516126556523

Genna Beth’s puppet head design. 

My dad is an engineer so sometimes I run things by him; he loves problem solving too. But on more than one occasion, he has wanted to take the design in a completely different direction. It’s at those times that I turn into a little kid again with the impulse to say: “No I want to do it by myself!” I have to remind myself it’s okay to learn from others and get more experience in the process. 

Announcing The Puppet Lobby!

In comparison to other art forms, the puppetry world is quite small. There aren’t hundreds of museums devoted to it, or dozens of performance spaces presenting it nearly every week of the year. Many puppeteers work solo, and only see their fellow puppet artists at festivals–when they have the resources and time to travel.

In an effort to foster community and knowledge, we have decided to try and create a regular space for puppeteers to gather and learn from each other in Washington, DC. We are calling this series of conversations The Puppet Lobby, as they will take place in the Selman Gallery that is the lobby of the Brookland Artspace Lofts. Our first conversation will be Monday, September 18 at 7pm and we hope you will join us for what is sure to be a fun, informative evening.

We have two great speakers for this first edition of The Puppet Lobby; master puppeteer Ingrid Crepeau and our own Genna Beth Davidson. Ingrid is a longtime resident of the Washington area and has built puppets for a wide variety of theaters including her own children’s theater company DinoRock. On Monday she will speak about building body puppets and mascots, an expertise she provides to just about every professional DC sports team. For more about Ingrid Crepeau, this Washington Post article is a great read. Genna Beth will be talking about Selkie, the main puppet in the second part of our work-in-progress show Malevolent Creatures. Selkie is a character who has to change between being human and being a seal, and Genna Beth is in the midst of figuring out how to make that happen.


Organize It!

By Genna Beth Davidson

When it comes to building puppets, you must bring together many different crafting skills: sewing, woodworking, papier mache, foam construction, painting, etc. I dream of one day having a huge studio capable of housing all the different arts that come together to create my puppets. But for the time being, I’m making do with a tiny space. It’s amazing what you can do with a small space if organized well.

20170904_110628

I have my work table on wheels so that I can easily move it around and away from the wall for sewing. My fabric is stored by color in a closet along with foam and batting. I have a power tools and hand tools section (which is slowly out-growing the space), my woodpile corner, a shelf for projects I’m working on, a shelf for papier mache paper, and a file drawer with deep, short drawers for flat artwork and pattern storage. I keep my sewing machine stowed under my work table, even though it’s a bit annoying having to pull it out every time I want to use it. If I had the ultimate studio, I would have a large, high table for laying out patterns and a dedicated table for sewing. Right now I often have to use the floor for laying out large patterns. I also have the ultimate junk drawer because you never know what you might need.

20170904_110622

I quickly outgrew this small space so now some of my materials take up bookshelf space in the hallway. That’s where I keep my paint supplies, beads, elastic, and assorted other adornments for the puppets. And I’m lucky that I have a back porch off the studio. My friend made me a big wooden table that I use as a workbench out there. In the winter it’s a little cold, but I manage.

Finally it’s really important to have boxes, pegboard, and other inventive ways of separating materials. I use a shoe organizer on the back of a door for feathers, leather, foam scraps, rope, plastic bag storage, etc. I use lots of large tupperware bins too, and a pegboard is great for easy access to tools.

20170904_110647If you are thinking about setting up a space for your crafting habit, a great place to look for organization ideas is Pinterest of course! But I recommend taking time to let things get organized as you go. It can be good to invest in top of the line organization, but you don’t have to. Sometimes things just find their way into a nook without you intentionally putting them there, or you come upon some organizational device that was intended for one thing but works perfectly for the storage of something else like my shoe organizer.

For me, organizing is fun! I think I’m lucky in that I inherited my mom’s need to organize and my dad’s habit for recycling and storing materials that could be useful at a later date. Thanks Mom and Dad!


Everything Wrong with This Caja Show

In 2012, I visited Argentina for the first time and I was fascinated when Mara Ferreya, a puppeteer from Cordoba, described a kind of street puppet show that took place in a box. She showed me a photograph, with three people all wearing headphones and looking through their own peephole at some invisible show inside a cardboard box. It didn’t look that hard to make.

Later that summer I made my first attempt at a similar show. I called it the Personal Puppet Show and performed it at farmer’s markets and community events. People liked it, but it was only after I went back to Argentina two years later and took a workshop with Mendoza puppeteer Gabriela Céspedes that I realized all of the things I had done wrong. Here is a list of them.

IMG_6149

1. The box is too shallow. I could only see one side of the box in Mara’s photo and I didn’t realize it had to be a certain depth. Part of the magic of caja lambe-lambe is that the tiny peephole creates a forced perspective for the viewer. This gets ruined, however, if the box isn’t deep enough and the puppets end up too close to the eye. My box is only about 6-8 inches deep which is great for transport, but not for creating a forced perspective.

IMG_6150

2. There are two eyeholes instead of one. This was purely me trying to be fancy. I thought two eyeholes would make it easier to see inside, but it’s actually the opposite. Because everyone has a slightly different distance between their eyes, some people find it much harder to focus, looking through two holes. One peephole per viewer works the best.

3. There is no viewfinder for the puppeteer. Another detail that I missed because I only saw a photo. There should be some kind of window in the back or the top of the box so that the puppeteer can see what they are doing. Otherwise, movement becomes imprecise and easy to mess up. Without a viewfinder, my puppeteering isn’t as good as it could be.

IMG_6151

4. There is a curtain at the back, instead of holes for the puppeteers hands. Another mistake that causes practical problems for puppeteering. Trying to smoothly move my hands (and puppets) between pieces of fabric is difficult and it’s easy for the cardboard puppets to get stuck. This creates a jerking motion as they enter the scene, which ruins the illusion of movement. Most boxes have holes for the puppeteer’s hands either at the back or the side, with a curtain over the top to block the light spill. It is much easier to place a puppet in front of this curtain and then enter the box, rather than trying to do both those movements at once. Another option if your puppets are on vertical rods is to cut the holes in the top of the box and bring the puppets in from above.

IMG_6152

5. The box isn’t created with a single show in mind. This is the biggest mistake I made, and it’s arguably the one that takes the Personal Puppet Show out of the category of caja lambe-lambe. A true caja show is a miniature world, one that is constructed for the purpose of telling one short, 1-3 minute story and that story alone. The walls, the floor, the ceiling, the puppets, the soundtrack–all of these should combine to create the illusion of a complete setting. My box, with its one-color walls, black curtain background and plain floor does not do this.

Despite (or perhaps because of) my many mistakes, I enjoyed building my Personal Puppet Show and felt very much at home with the style of puppetry. After studying with Gabriela Céspedes and building a second show as part of the 2015 Fringe project I Thought the Earth Remembered Me I was only more convinced. This year, I’m looking forward to premiering my third caja show, called Library Love and demonstrating how much I’ve learned since I first built the Personal Puppet Show.

Summer Days at the Studio

IMG_4225It’s been four years since we started Wit’s End Puppets and for all that time, we’ve been operating primarily out of a house in the southwest quadrant of Washington DC. Each person on the team had her own workspace at home, but meetings and large building projects, from covering flats with recycled paper, to gluing together a 60ft cranky, happened in the living room of that house.

This summer, we said goodbye and moved our boxes, puppet sets and building materials to a new studio in the Brookland neighborhood. At first, the space looked like it does in the photo above. It took a lot of time and effort, but we’ve finally made progress and everything is (mostly) organized. Here you can see the two sides of the room, with materials and tool storage and plenty of surfaces to work on. Here’s to another four years of creativity and passion, collaboration and puppet magic!img_4530

img_4531

Stars and Space Creatures

We are nearly done with objects for Arts on the Horizon’s new baby theater show Space-Bop. We are thrilled to be collaborating again with Tia Shearer-Bassett and working for the first time with Christylez Bacon and Seamus Miller. Back in the summer of 2015 we participated in a workshop of this piece and now rehearsals start in just a few days! Meanwhile, here are some photos from the building process.

IMG_3495

A new star pattern, with one of our light-up gadgets in the background.

IMG_3552

A rather bumpy planet surface.

IMG_3561

The somewhat messy beginnings of another planet.

IMG_3562

Pieces of the astronaut helmet, before being put together.

Hand Puppets in Central America

Students in El Salvador show off their sock puppets.

Students in Ilobasco show off their sock puppets.

After traveling to Canada and Armenia, my final adventure of the summer season was heading to two different countries in Central America to teach puppet workshops. Under the auspices of the non-profit Co-partners of Campesinas, I was invited to teach puppetry to students in the towns of Ilobasco in El Salvador and Chichicastenango in Guatemala.

A teen from El Salvador with his hand puppet. The head is a gourd that grows locally.

A teen from Ilobasco with his hand puppet. The head is made from a gourd that grows locally.

These two workshops were structured very differently. In Ilobasco, students ages 6-25 were grouped by age for a week long art and conflict resolution workshop during a school holiday. Due to changing school schedules, transportation challenges and family obligations, there were different numbers in the classes each day and not all students were able to stay for the entire workshop. Despite this, the younger students built sock puppets and used them to invent short scenes while the older students experimented with constructing hand puppets that used local gourds as heads.

A student in Guatemala sews her puppet's body.

A student in Chichicastenango sews her puppet’s body.

In Chichicastenango, the workshop was hosted by a community organization called ASDECO and lasted for five days. I had a class of about 20 students, mainly teens and young adults, with some older participants, who made paper mache hand puppets. Unlike in El Salvador, where the focus of the workshop was creative expression, this one was intended to further the cultural goals of ASDECO who are dedicated to preserving and sharing the indigenous Ki’che culture of the region. Magdalena, an ASDECO staff member, led discussions about the traditional Ki’che stories of the Popol Wuj, which the students then turned into a short puppet play. I taught the group to construct hand puppets of the play’s characters with paper maché heads and cloth bodies. The finished piece was shared with the center’s staff and other community members on our final day.

Puppetry is not a very common art form in Central America. Few of my students in either Ilobasco or Chichicastenango had ever seen a puppet show and usually it was on TV rather than live. It was wonderful to see the students making creative decisions as they built their puppets and sometimes using other skills such as embroidery or beadwork to add to puppet clothing. I’m looking forward to seeing what else these artists create in the future.

The class in Chichicastenango, with their puppets.

The class in Chichicastenango, with their puppets.

Outer Space and Baby Theater

Workshop moment with a rocket ship! Photo courtesy of Arts on the Horizon.

Workshop moment with a rocket ship! Photo courtesy of Arts on the Horizon.

Along with the Capital Fringe Festival and our one-night revival of Saudade, this summer was spent working with our friends at Arts on the Horizon to workshop a new baby-theater show called Space-Bop. It stars a clown and musician who travel into outer space, encountering planets, stars and space creatures. Among the objects we created for them is a colorful rocket ship, a tiny astronaut and a pet star.

One of the challenges of this show was coming up with ways to make objects light up, since light and darkness is important to our ideas of outer space and bright lights are engaging for very young audiences. It was very gratifying at the workshop performances to hear tiny voices say “How does it DO that?” As we look ahead to the full production this winter, we are pulling inspiration from other environments to add to our imagined idea of this space-world.

One big inspiration for our work on this piece was the Australian puppet show The Adventures of Alvin Sputnik. Strangely enough, there are many connections to be made with underwater adventures and outer space. Other sources for visuals include classic moon landing photographs, early cinema such as this gem from Georges Melies and vintage design featuring rocket ships. We will post more process photos as we continue working and if you have a little one or just like wordless theater, be sure to put the show on your calendar for February.